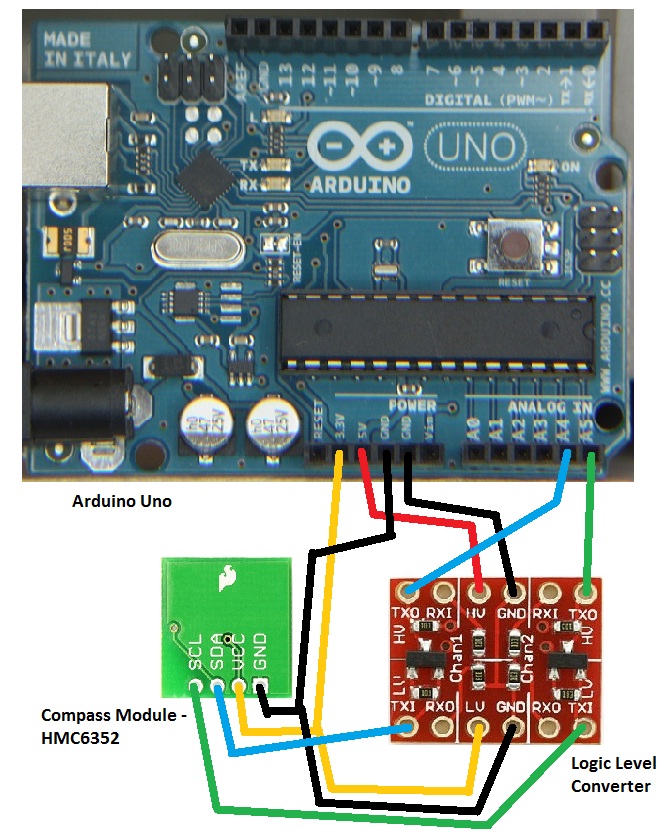
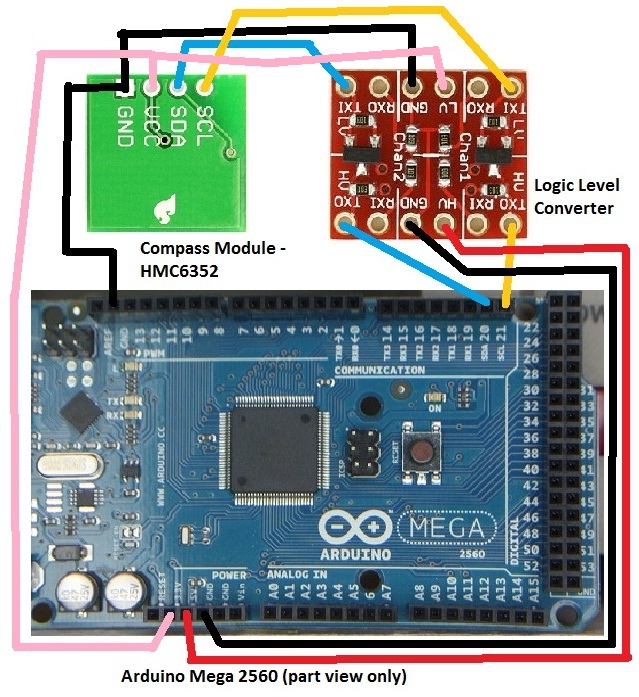
This mini project shows how to connect the Sparkfun Compass Module (SKU SEN-07915) to both the Arduino Uno and the Arduino Mega 2560. As these two Arduino boards are 5V devices, and the Compass Module is a 3.3V module, the I2C bus must be translated. This is done using the Logic Level Converter from Sparkfun (SKU BOB-08745).
To help, included here are two diagrams of the wiring needed. Note that the Mega has specific I2C pins available while the Uno uses Analog pin 4 for SDA and Analog pin 5 for SCL. SDA is the data line, and SCL is the clock line.
The Arduino has pull up resistors built in and the Compass Module has them as well so there is no need to add them in this case.
Both the wiring diagrams and the code will read the compass module twice per second and send it out via serial to the computer where it can be viewed by a serial aware program like the serial viewer in the Arduino software.
Wiring up the Uno, connect the following:
- +5V and GND connects from the UNO to the hv side of the level converter
- +3.3V and GND connects from the UNO to the lv side of the level converter
- Connect Analog pin A4 from the UNO to Ch1 TXO on the level converter
- Connect Analog pin A5 from the UNO to Ch2 TXO on the level converter
- +3.3V from the UNO also connects to the VCC on the compas module
- GND from the UNO connects to the GND on the compas module
- SDA on the compas module connects to Ch1 TXI on the level converter
- SCL on the compas module connects to Ch2 TXI on the level converter
See the following picture for details
How to wire the compass module to the Arduino Uno via the level shifter from Sparkfun
Wiring up the Uno, connect the following:
- +5V and GND connects from the MEGA to the hv side of the level converter
- +3.3V and GND connects from the MEGA to the lv side of the level converter
- Connect pin 21 SCL from the MEGA to Ch1 TXO on the level converter
- Connect pin 20 SDA from the MEGA to Ch2 TXO on the level converter
- +3.3V from the UNO also connects to the VCC on the compas module
- GND from the UNO connects to the GND on the compas module
- SDA on the compas module connects to Ch1 TXI on the level converter
- SCL on the compas module connects to Ch2 TXI on the level converter
See the following picture for details
How to wire the Sparkfun Compass Module to the Arduino Mega 2560
The source code.
And here is the code, inspired by the code posted by Vaibhav Bhawsar. Note the source is the same for both boards.
#include <Wire.h> // Where all the routines for controlling
                  //    the I2C bus are
int HMC6352 = 0x42; // device address from the data sheet
int slaveAddress; // variable to hold the slave address
int ledPin = 13; // LED on the Arduino board
boolean ledState = false; // state of the LED for the flash routine
byte headingFromCompass[2]; // array to store the two byte data from compass
int i; // array element id
int heading; // calculated heading for printing

void setup()
{
  // The wire library only wants the 7 most significant
  //   bits of the address.
  slaveAddress = HMC6352 >> 1;
  Serial.begin(9600); // Start Serial, change baud rate to suit
  // Set the LED pin as output to show program is running
  pinMode(ledPin, OUTPUT);
  Wire.begin(); // Initialise the Two Wire Interface (I2C)
}

void loop()
{
  ledState = !ledState;
  if (ledState)
  {
    digitalWrite(ledPin,HIGH);
  }
  else
  {
    digitalWrite(ledPin,LOW);
  }

  Wire.beginTransmission(slaveAddress);
  Wire.send(0x41); // Send the Get Data command
  Wire.endTransmission();
  delay(10); // The HMC6352 needs 70us delay
  // Request 2 bytes of data (MSB then LSB)
  Wire.requestFrom(slaveAddress, 2);
  i = 0; // This is used as the array element pointer for
         //   data
  while(Wire.available() && i < 2) // We're receiving data
  {
    // Put the data into the array element
    headingFromCompass[i] = Wire.receive();
    i++; // increment for the next data piece
  }
  // Combine MSB and LSB
  heading = headingFromCompass[0]*256 + headingFromCompass[1];
  // Change the following output to suit your application
  Serial.print("Heading: ");
  // The whole number part of the heading
  Serial.print(int (heading / 10));
  Serial.print(".");
  // The fractional part of the heading
  Serial.print(int (heading % 10));
  Serial.println(" degrees");
  delay(500);
}

